By Lucídio Neto
-
Introduction
It’s no news that there are currently numerous Cloud providers. These in turn, seeking to facilitate the handling and administration of their portals, often allow for features that can become the object of attack exploitation.
We can say that in AWS (Amazon Web Services) the key is the new perimeter, meaning that with possession of a key (along with the secret and optionally the session token), we can access the cloud environment of the company that owns the key in question.
Given that the use of keys by default has no limits, since the AWS API is exposed and public, basically when this key is accessed by someone unauthorized, they can use it without restrictions, according to the privileges granted to it.
There are several ways to access a key, some possibilities are listed below:
i. Web Console / API (time of creation);
ii. Application;
iii. Metadados (http://169.254.169.254);
iv. Code leakage;
v. Endpoint (.aws/credentials , history, hardcoded, .csv files of creation …);
vi. Third parties (Cross Account);
vii. Tools configuration (scans, CI/CD);
viii. Social Engineering.
In this context, two super important points arise to mitigate the problem of key leakage, first, minimum privilege and, second, the conditional part of access. This second part makes the use of the leaked key more challenging for the attacker, as it adds an extra layer, which will need to be discovered and exploited, to use it.
Therefore, this article aims to allow professionals or those interested in the subject of cybersecurity to understand our experience and suggestion on how to implement an architecture that contains conditional access (in this particular case in AWS policies), as a way to add another layer of security in the administration process of the provider used, through Single Points of Access (PUA).
SCENARIO DESCRIPTION
The scenario created, presented and proposed in this article, will deal with the concepts of AWS, however, the modus operandi of the philosophy can be transferred to other Cloud providers. It’s worth mentioning that the steps described below were not applied to the access rules to the services available on AWS, only to the accesses of the administrative keys.
The scenario proposed here will use open source resources, such as: Linux, IPTables, Squid and OpenVPN to set up the environment.
In this case, we have a Linux server running the VPN Server and Proxy Server services that will enable the access of the cloud service provider’s administrators (Cloud). The main idea is to restrict all administrative access to a specific origin, minimizing the possibility of exploiting an attack in case of credential leakage. Below is an illustration of this access flow in Figure 1.

Next, the details of the implementation of the aforementioned scenario will be presented, as a form of collaboration for readers interested in replicating it and obtaining the advantages and results achieved by our team.
-
Server Environment
In this section we’ll mention the tools, the operating system and an overflight at 10 thousand feet, discussing the configurations performed in each of the tools used in the server to enable the proposed scenario.
As seen in “Figure 1” the server is our Single Point of Access (PUA), which means it will be where administrative users will establish a VPN (Virtual Private Network) so that it is possible to use a proxy, to enable access to AWS.
The proxy mentioned in the previous paragraph should also be used in addition to connections to the AWS console, but also for connections that may use the “aws cli”, available at: “https://aws.amazon.com/pt/cli/”.
Without further ado, let’s go to the peculiarities of each item mentioned.
2.1. Operating System
The Linux Server can be any machine, including VPS (Virtual Private Server), On-Premise server or an EC2 instance on AWS. In the case proposed here, an EC2 instance on AWS running Debian 11 Linux operating system was used.
The AMI (Amazon Image) used to launch the EC2 instance was selected from the list of AMIs maintained and managed by the Debian team itself, available at the following link.
- https://wiki.debian.org/Cloud/AmazonEC2Image/Bullseye
2.2. Firewall rules
The tool used to configure the firewall rule was IPTables, which is referenced in the item 8. of this article.
In order to keep the access to the Linux server where the VPN will be established even more restricted, it was decided to hide the VPN server port and configure a port knocking to make the VPN server port available by running a challenge.
# port-knocking

ipset create  portknock_p1 hash:ip timeout 60 2> /dev/null
ipset flush    portknock_p1
ipset create  portknock_p2 hash:ip timeout 60 2> /dev/null
ipset flush    portknock_p2
ipset create  portknock_p3 hash:ip timeout 60 2> /dev/null
ipset flush    portknock_p3

iptables -A INPUT -p tcp –dport 11111 -j SET –add-set portknock_p1 src
iptables -A INPUT -m set –match-set portknock_p1 src \
               -p tcp –dport 22222 -j SET –add-set portknock_p2 src
iptables -A INPUT -m set –match-set portknock_p2 src \
               -p tcp –dport 33333 -j SET –add-set portknock_p3 src

iptables -A INPUT -m set –match-set portknock_p3 src -p tcp –dport 1194 -j ACCEPT
In the example above, only the rules related to port knocking are found, i.e., when connecting to this sequence of ports in the proposed time interval and in the sequence arranged, the port 1194/TCP of OpenVPN will be available for the time interval of 60 seconds for the source IP that performed the proposed challenge.
After performing the port knocking, the user will be able to establish the VPN.
2.3. VPN service
As mentioned in the Introduction section, the program adopted for the VPN service was OpenVPN, and the way the service was configured requires the connection to be established using a digital certificate. An example of Openvpn configuration using a digital certificate to establish the VPN is shown below.
# openvpn configuration
local 0.0.0.0
port 1194
proto tcp
dev-type tun
dev tun0
proto tcp-server
mode server
tls-server
tcp-queue-limit 512
tls-verify "/etc/openvpn/scripts/verify-dn /etc/openvpn/authentication/AllowedUsers"
remote-cert-tls client
client-config-dir /etc/openvpn/ccd
comp-lzo
keepalive 10 120
cipher AES-256-CBC
data-ciphers AES-256-CBC
max-clients 500
persist-key
persist-tun
status /var/log/openvpn/openvpn-status.log
log-append  /var/log/openvpn/openvpn.log
verb 4
script-security 2

ca   	/etc/openvpn/certs/cacert.pem
cert 	/etc/openvpn/certs/server_cert.pem
key  	/etc/openvpn/keys/server_key.pem
tls-auth /etc/openvpn/keys/tls-auth.key 0
dh   	/etc/openvpn/keys/dh1024.pem

#-- IPs configuration
ifconfig 10.0.0.254 10.0.0.253
route 10.0.0.0 255.255.255.0
ifconfig-pool 10.0.0.200 10.0.0.250
Here we won’t contemplate the procedures related to the generation and maintenance of Digital Certificates, it’s implied its previous knowledge. In this link https://openvpn.net/community-resources/setting-up-your-own-certificate-authority-ca/, there are some explanations for further consultation.
So, in order to be able to establish the VPN, the user must have a Digital Certificate of the “client” type issued by the same Certificate Authority that generated the Digital Certificate of the “server” type used in the OpenVPN service configuration.
2.4. Proxy Service
The proxy tool adopted was the Squid Server. Its installation can be performed by default, i.e. “apt-get install squid”, and its configuration requires only the adjustment of an Access List (ACL) rule.
Below you can see the configuration of an ACL setting to allow the range of the example presented to make use of the proxy service.
root@linux-srv:~# grep localnet /etc/squid/squid.conf
acl localnet src 10.0.0.0/24                   # RFC1918 possible internal network
http_access allow localnet
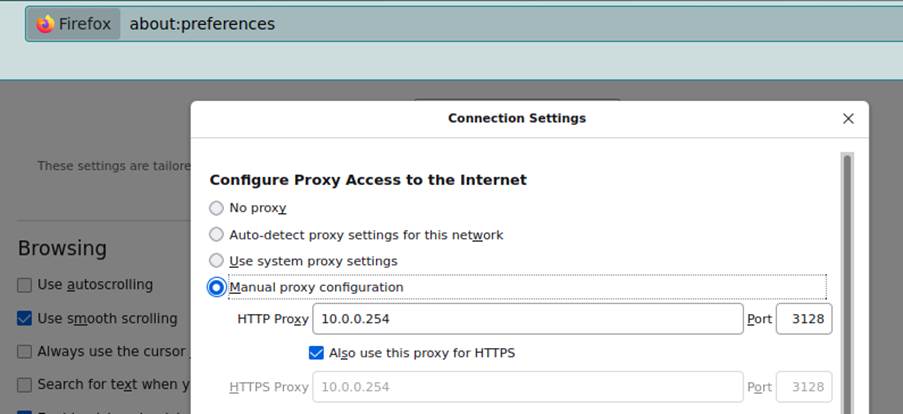
With the VPN established, you must set the Proxy in the browser that will be used to connect to AWS. As an example, firefox was chosen, so, to perform the configuration, access the Firefox preferences, and at the end of the General settings tab, there is a link to “Proxy Settings”.
After performing the procedures proposed so far, the user will be able to make requests to AWS using the routable IP of the Linux Server from Section 2.1.
-
Environment in AWS (Amazon Web Services)
In AWS the concept of multiple accounts will be adopted, it’s not the scope of this article to make a defense about such practice, but… making a quick explanation about the segregation of accounts, we can mention that such practice is extremely beneficial in terms of security where it can enable the isolation of the production environment from the homologation environment and etc. Not to mention the delimitation of costs, discriminating exactly how much each environment is consuming.
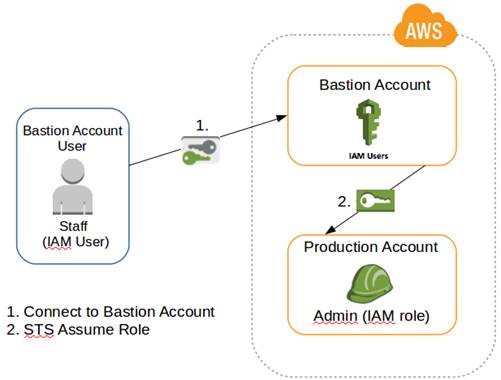
So, as a proof of concept, the scenario presented here will have 2 accounts, one from now on called Bastion and the other Production. However, the concept can be extended to other accounts, such as: Stage Account, Homologation, QA, etc…
3.1. Configuration of the Bastion account.
The function of this Bastion account is only to contain the users, not supporting any service in it. Users who connect to this account will have absolutely no access other than the permission to switch roles to the other account, in this case Production.
So the idea is that the user is created and placed in a group where he only has permission to make the switch role for the Production account.
Remembering that it’s extremely important that the user created has his MFA (Multi-factor authentication) configured, there can be no administrative user without such functionality enabled.
Good security practices recommend that if other accounts exist in the organization, they should have the IAM functionality restricted and/or disabled. This practice facilitates the access model presented here, as well as system administration and user identity management.
In the case of AWS, the restrictions mentioned in the previous paragraph can be performed using the Control Tower service and/or rules in the Organization’s SCP (Service Control Policy).
3.1.1. Policy Bastion-IAM-Policy-Production
In order to create the group and add the user to it, we must first create the policy. Then, we will show the creation of the policy (Bastion-IAM-Policy-Production) that only has permission to make switch role for the target account and that has the IP conditional, mentioned in the Introduction of this article.
As an example, the Production account will be referenced with the ID: 22222222.
{
   “Version”: “2012-10-17”,
   “Statement”: [
      {
         “Sid”: “AllowSTS”,
         “Effect”: “Allow”,
         “Action”: [
            “sts:AssumeRole”
         ],
         “Resource”: [
            “arn:aws:iam::222222222222:role/Production-IAM-Role-Admin”
         ],
         “Condition”: {
            “IpAddress”: {
               “aws:SourceIp”: [
                  “1.2.3.4/32”
               ]
            }
        }
      }
   ]
}
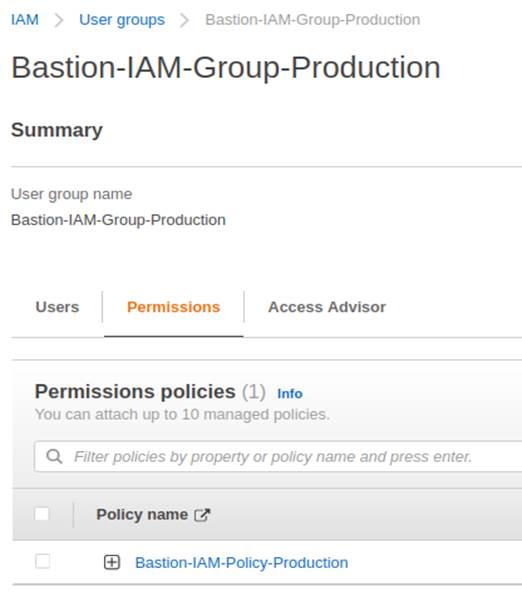
3.1.2. Bastion-IAM-Group-Production Group
To accommodate the user, a group is created (Bastion-IAM-Group-Production) and the policy Bastion-IAM-Policy-Production is added, including the user who will utilize the resource.
The policy attached to the group is illustrated below.
3.2. Configuration of the “Production” account
The intention is that access to this account is strictly conditioned to the IP of the Linux Server configured in section 2. To do this, the Production account is initially accessed and the Production-IAM-Policy-Admin policy is created.
{
   “Version”: “2012-10-17”,
   “Statement”: [
      {
         “Effect”: “Allow”,
         “Action”: “*”,
         “Resource”: “*”,
         “Condition”: {
            “IpAddress”: {
               “aws:SourceIp”: [
                  “1.2.3.4/32”
               ]
            }
        }
      }
   ]
}
Then, the Role Production-IAM-Role-Admin is created and the policy Production-IAM- Policy-Admin is attached.
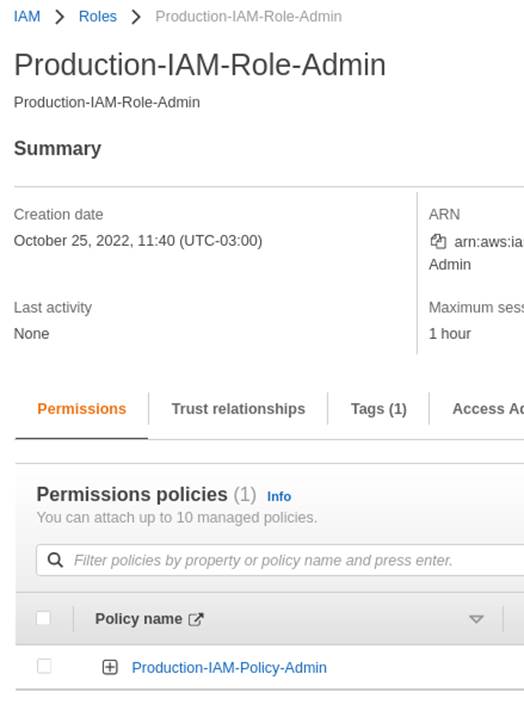
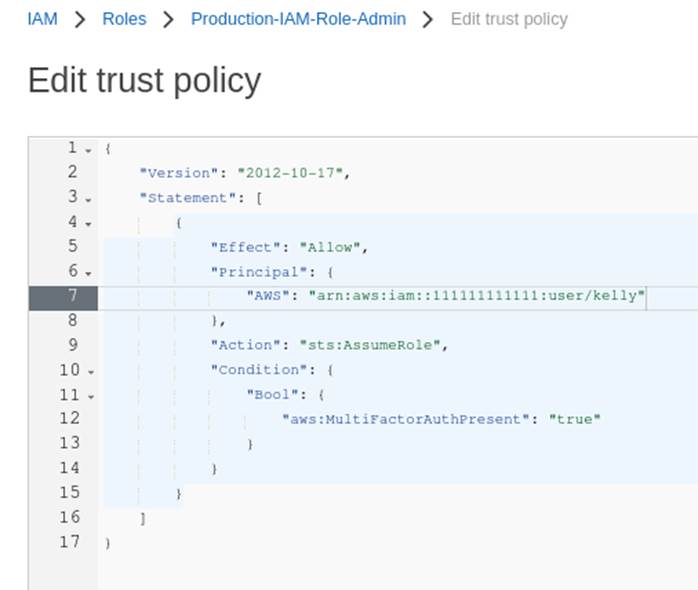
In the “Trust relationships” section illustrated in Figure 4, it’s necessary to edit the policy and adjust it for the user who will perform the Switch Role, according to Figure 5 below.
-
Connecting the dots
With the items described in sections 2 and 3 properly adjusted, and considering that the administrator user already has his workstation operational, meaning, with his notebook with the OpenVPN client installed and with his Firefox browser correctly configured to use the proxy, this user can perform the following steps to make use of the resources.
- Perform port knocking to gain access to the OpenVPN port;
- Establish the VPN connection;
- Access the AWS authentication page (https://console.aws.amazon.com/console/home) with Firefox previously configured (see section 2.4).
- Fill in the authentication form with the requested data;
- Once authenticated with the Bastion account, the switch role for the Production account is executed.
The final flow of the aforementioned connection is illustrated below in Figure 6:
(Source: CReated by the author, 2022)
- AWS-CLI (Command Line Interface)
In the case of using “aws cli” for resource administration, procedures “a” and “b” of section 4. must be executed and the http_proxy and https_proxy variables properly set to the IP address and port of the Proxy configured in section 2.4. In the example presented here it would look like this:
export http_proxy=”http://10.0.0.254:3128”
export https_proxy=”http://10.0.0.254:3128”
The actions “aws sts get-session-token” and “aws sts assume-role” should be used for the authentication to the bastion account and the switch-role to the target account. Detailing the commands a little bit:
aws sts get-session-token
The get-session-token will be used for authentication in the bastion account and acquisition of the token that will be used in the switch role for the destination account. See an example:
aws sts get-session-token --serial-number arn:aws:iam::111111111111:mfa/user \
	--token-code XXXXXX --profile default
The sequence 111111111111 should be replaced by the Bastion account ID, the “user” should be replaced by the user name created in section 3.1 and the XXXXXX replaced by the token presented by the MFA manager application, such as Authy or Google Authenticator, which should have the access key of the user used at the time.
The execution of the get-session-token action will provide the credentials (access_key, secret_key and session_token) that will feed the “mfa-user” profile that will be applied in the next command.
aws sts assume-role
The “sts assume-role” action, as the name suggests, is used to make it possible to perform the “Switch Role” for the target account. Example of the use of the action:
aws sts assume-role --role-arn \
arn:aws:iam::222222222222:role/Production-IAM-Role-Admin \
	--role-session-name bastion-account-session --profile mfa-user
Where the sequence 222222222222 should be replaced by the target account ID and the “mfa-user” should be replaced by the name of the profile configured for the occasion.
The execution of the “sts assume-role” action will provide the credentials (access_key, secret_key and session_token) that will feed the “production-account” profile that will be used to execute the commands.
Naturally, the “default” and “mfa-user” profiles mentioned here must be configured according to the access_keys, secret_keys and session_token received during the connections.
We won’t describe here how to generate and manage the respective profiles, we only illustrate their format which should be in the file ~/.aws/credentials.
[default]
aws_access_key_id = xxx…
aws_secret_access_key = xxx…

[mfa-user]
aws_access_key_id = xxx…
aws_secret_access_key = xxx…
aws_session_token = xxx…

[production-account]
aws_access_key_id = xxx…
aws_secret_access_key = xxx…
aws_session_token = xxx…
With the production-account profile configured and the http_proxy and https_proxy environment variables properly set, the desired command is executed, in this case we illustrate the command for a bucket listing.
aws s3api list-buckets --profile production-account
-
Other applications
The concept of Militarized Perimeter for administrative access to the Cloud can be used both in multi-cloud and in specific cloud services. As an example we’ll mention the SSO (Single Sign On) service from AWS.
SSO, in addition to naturally managing the user’s MFA issue, also allows Policies and Roles to be configured in the same way as those presented here in this article.
In this way, the user can only and only log on to the SSO respecting the MFA and can only perform any activity in the accounts to which he is allowed access, if he is strictly within the Militarized Perimeter, in other words, with the VPN established and with the proxy properly adjusted.
-
Final considerations
Based on the experience and results obtained with the solution presented in this article, we can notice that, even though some level of additional effort is required to implement this solution, the achieved protection benefits are well worth it.
Our practical experience has shown that this configuration of a single point of access, with user isolation and restriction in the switch role policies is very effective in protecting the account in case of a possible credential compromise.
We hope that the article presented here will be useful and serve as a prelude to clarify doubts and encourage the use of solutions involving access restrictions.
-
References
Amazon Web Services. AWS, 2022. Available at: https://aws.amazon.com. Accessed on: October 26, 2022.
Netfilter. IPTables, 1999-2021. Available at: https://netfilter.org. Accessed on: October 26, 2022.
OpenVPN, 2022. Available at: https://openvpn.net. Accessed on: October 26, 2022.
The Linux Foundation. Linux, 2022. Available at: https://www.linuxfoundation.org. Accessed on: October 26, 2022.
The Squid Project. Squid, 2022. Available at: https://squid-cache.org. Accessed on: October 26, 2022.