By Enzo Ferrari
The Rise of REST
Roy Fielding created the REST (Representational State Transfer) style of software architecture in his doctoral thesis, where, briefly, he suggests a stateless client/server communication protocol. In this way, separation of responsibilities occurs: the client doesn’t need to worry about what happens on the server side, and the server also doesn’t need to worry about what happens on the client-side. Together, the operations that could be done through the protocol were defined: POST, PUT, GET and DELETE, presenting a unique and very specific function.
The paradigms suggested by the REST standard were seen with good eyes by the developer community, which ended up giving REST the status of a standard protocol for modern Web APIs.
The REST Barriers
Due to the boom in the technology market after the 2000s, the REST protocol already exhibited some barriers, which became evident especially after the integration of mobile devices into the mainstream development ecosystem starting in 2007.
Let’s imagine the following scenario: we need to serve a REST API to different types of clients, such as other backends, web applications, and mobile applications. The backend client relies on abundant data transfer speed, so it needs more data for analytics processing and machine learning model training. The web client needs only the data to be displayed to the user and for telemetry; in this scenario, the transfer speed is limited because users are all over the world, with varying ISPs (Internet Service Providers). Finally, the mobile client relies on a transfer speed that can be much lower, as they may be on a GSM, 3G, HSPA, or other networks. In this case, there is also concern about the speed of the hardware since this can be quite limited when compared to a desktop. It is always important to think about uses that extend the phone’s battery life.
Faced with these scenarios, the solution to be implemented through REST can become quite redundant, with specific routes for each client and even inconsistencies between the three client types. In addition, it may be necessary to split this REST service between platforms, so a single customer with all three scenarios will need its data to be updated, documented, and tested on-demand in three different locations at the same time.
Creating an alternative
The above scenario happened to the Facebook team in 2012 and motivated them to look for a solution to this challenge. Thus, GraphQL was born. All the notion of routes, POST, PUT, GET and DELETE operations were left aside, being replaced by the notion of queries and mutations. As the names make clear, queries are used to request data, while mutations are used to create or change data on the server. Although still stateless, GraphQL ends up transferring some of the responsibility from the server to the client since the client must declaratively request all data.
Thus, calls to various REST endpoints can be replaced by a single query to a GraphQL endpoint. It is also possible to filter out unnecessary data, preventing over-fetching, which would be a problem, especially for mobile clients.
REST vs. GraphQL
Assuming the need to access a developer’s name, along with the name of their public repositories, the following calls were made to the GitHub REST API:
curl -i https://api.github.com/users/ferrarienz0

HTTP/2 200

server: GitHub.com

...

{

  "login": "ferrarienz0",

   ...

  "repos_url": "https://api.github.com/users/ferrarienz0/repos",

  "type": "User",

  "site_admin": false,

  "name": "Enzo Ferrari",

  "company": “AllowMe - Intelligence By Tempest”,

   ...

}
If we want to view the repositories of user ferrarienz0, we should make a new request to the endpoint specified in the “repos_url” property.
curl -i https://api.github.com/users/ferrarienz0/repos

HTTP/2 200

server: GitHub.com

[

  {

    "id": 354568895,

    "node_id": "MDEwOlJlcG9zaXRvcnkzNTQ1Njg4OTU=",

    "name": "50sec",

    "full_name": "ferrarienz0/50sec",

    "private": false,

    ...

  }

  ...

]
To access the developer’s name and the name of his repositories, two calls to two separate endpoints were required. Furthermore, a massive amount of data was returned that was unnecessary to the assumed situation (here, you can perform these calls, especially the second one, and see for yourself).
For the same case, we can use the GraphQL API from GitHub, so the query would be:
query {

  user(login: "ferrarienz0") {

    name

    repositories(first: 5, privacy: PUBLIC) {

      nodes {

        nameWithOwner

      }

    }

  }

}
And it would return:
{

  "data": {

    "user": {

      "name": "Enzo Ferrari",

      "repositories": {

        "nodes": [

          {

            "nameWithOwner": "ferrarienz0/VSOverflow"

          },

         ...

        ]

      }

    }

  }

}
That is exactly what we declared in the query. There are no multiple calls or over-fetching. You can test this query in the GraphQL API explorer on GitHub.
Not everything is sunshine and rainbows
Despite solving the problems explained above, GraphQL brings other challenges, such as implementation complexity. The developer must deal with several ways of querying the database and building the GraphQL schema. This can be exhausting, considering the number of resources exposed by the API. You also have to deal with potentially dangerous queries since the way the schema is created can leave it open to recursive queries, which demand a lot of processing and can lead to a DoS (Denial of Service).
Example of a recursive query:
query {

  repositories {

    name


    contributors {

      name


            repositories {

                        name


contributors {

           repositories {

             ...

           }

                        }

            }

    }

  }

}
Also, a developer has a bigger learning curve to deal with GraphQL than with REST due to the additional complexity that the new possibilities bring. Finally, the cache storage is simpler in REST, requiring more effort to achieve similar results in GraphQL.
Hasura
Hasura emerges to circumvent this development complexity as an open-source service, which allows GraphQL API’s to be generated from a SQL Server or Postgres database without the developer needing to create and maintain that server.
Among the advantages are:
- Integrated caching;
- Choice of tables to be crawled on demand;
- Low latency;
- The simplicity of configuration.
Pre-Requirements
Configuring the services – Postgres
You can already upload a postgres container with Hasura configured via the docker-compose file that can be accessed here. However, for demonstration purposes, we will configure Hasura and connect to postgres only when we finish configuring the database. To upload a postgres database, we will use docker.
docker run --name hasura-postgres \

-e POSTGRES_USER=tempest \

-e POSTGRES_PASSWORD=password \

-d postgres
Now we need to create our schema for the database. We’ll create a very simple schema, one table of users and one of the posts, so each post must belong to a user.
To access the postgres CLI through docker:
docker exec -it hasura-postgres psql -U tempest
We will create a database named hasura_app:
CREATE DATABASE hasura_app;
We can then connect to the created database and create our schema.
 // Conectar ao db hasura_app
\c hasura_app;

// Criar tabela de usuários
CREATE TABLE users (
 id serial PRIMARY KEY,
 username VARCHAR(12) UNIQUE NOT NULL,
 password VARCHAR(50) NOT NULL,
 email VARCHAR(100) NOT NULL
);

// Criar tabela de posts
CREATE TABLE posts (
 id serial PRIMARY KEY,
 user_id INT NOT NULL,
 content TEXT NOT NULL,
 FOREIGN KEY (user_id) REFERENCES users (id)
);
Finally, for testing purposes, let’s populate the tables in our database.
// Users
INSERT INTO users (username, password, email) VALUES ('tempest', 'password', '[email protected]'),
('allowme', 'password2', '[email protected]');

// Posts
INSERT INTO posts (user_id, content) VALUES
(1, 'A Tempest possui o portfólio mais completo em cibersegurança no Brasil.'),
(2, 'Seu ambiente digital mais simples e seguro.');
Now our database is ready =D. To disconnect from the CLI:
\q
To connect our postgres container to the hasura container that will be created, we will need a network:
// Criando a network para conectar postgres e hasura

docker network create -d bridge hasura-network


// Conectando o container do postgres à rede

docker network connect hasura-network hasura-postgres
Configuring Services – Hasura
We can create the hasura container already connected to the network.
docker run --name hasura \

  -p 8080:8080 \

  -itd --network=hasura-network \

  -e HASURA_GRAPHQL_DATABASE_URL=postgres://tempest:password@hasura-postgres:5432/hasura_app \

  -e HASURA_GRAPHQL_ENABLE_CONSOLE=false \

  hasura/graphql-engine:v2.0.1
After this step, everything is already working, and our Hasura is already connected to Postgres =D. We will need to configure the project, which will be responsible for managing migrations. To do so:
// Criar o projeto na pasta “hasura”

hasura init hasura --endpoint http://localhost:8080


cd hasura


Alguns arquivos e pastas já estarão criados, serão eles:


config.yaml metadata migrations seeds


Inicializando as migrations:


hasura migrate create "init" --from-server
We will need to copy the ‘version’ to apply it to the database, so Hasura will know that the current version of the database is already the most updated one:
hasura migrate apply --version "<version>" --skip-execution --database-name hasura_app
To finish the configuration, we export the metadata:
hasura metadata export
Now that we have configured everything we needed, we can access the Hasura console with the following command:
// O console será servido em alguma porta a partir do localhost

hasura console
We can enable tracking for the desired tables by selecting the public folder. Since we want to track all of them, let’s click on ‘track_all’, as shown in the following figure.
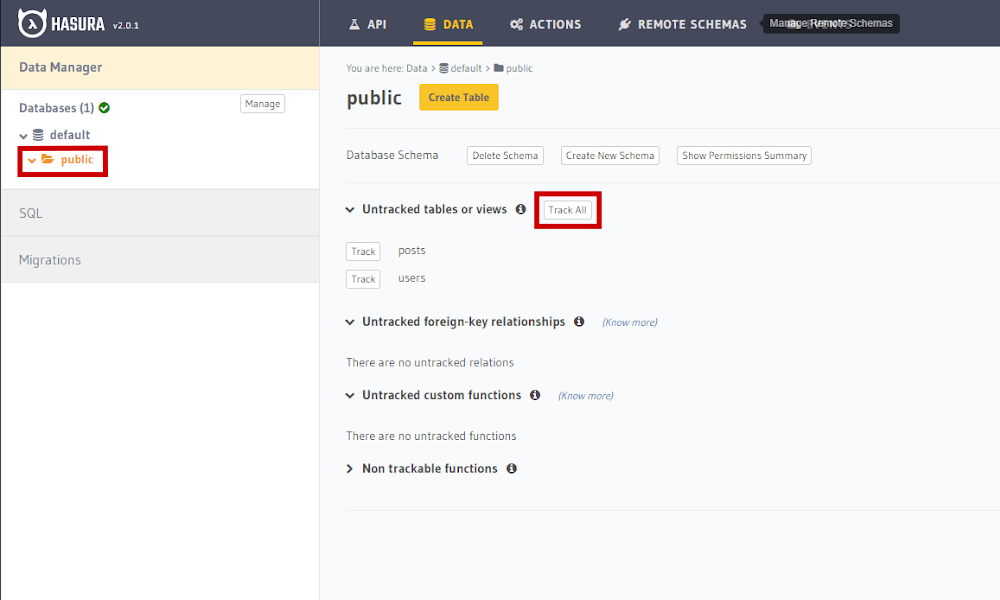
The relationships are also known automatically, so we will track all of them by clicking on ‘track_all’, as shown in the image below.

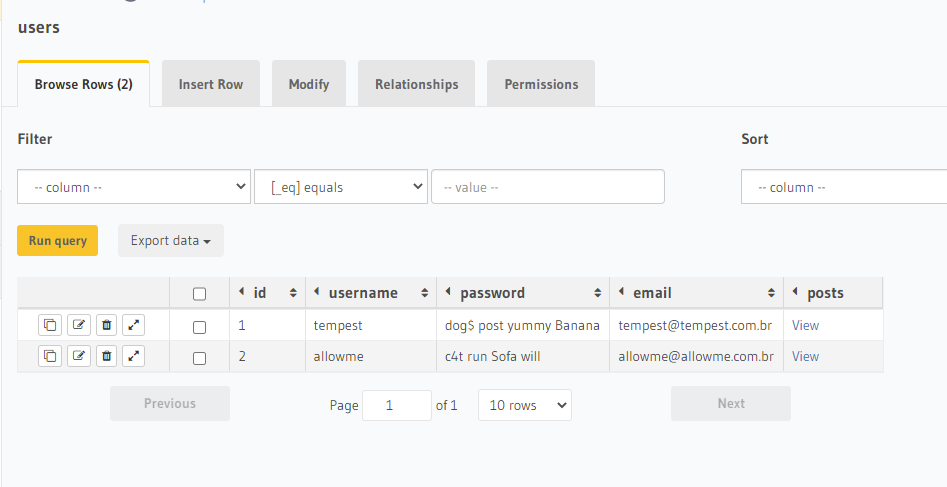
We can view the information from the ‘data’ tab.
And we can also modify our schema to add a new column.

When we click ‘Save’, a migration is automatically generated inside the ‘migrations’ folder of the Hasura project that we started using the CLI, with the up.sql and down.sql files.
Now the most interesting thing: in the API tab, you can see that Hasura has automatically created a GraphQL API mapping the tables in tracking, making it possible to do subscriptions, mutations, and queries =D
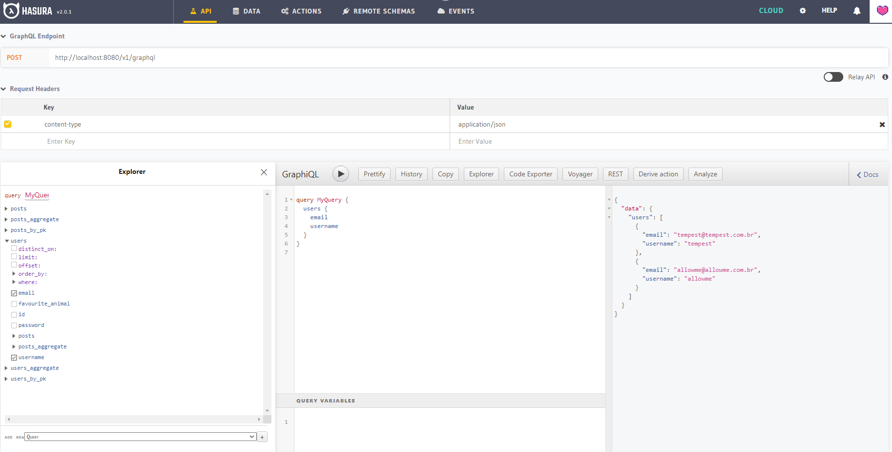
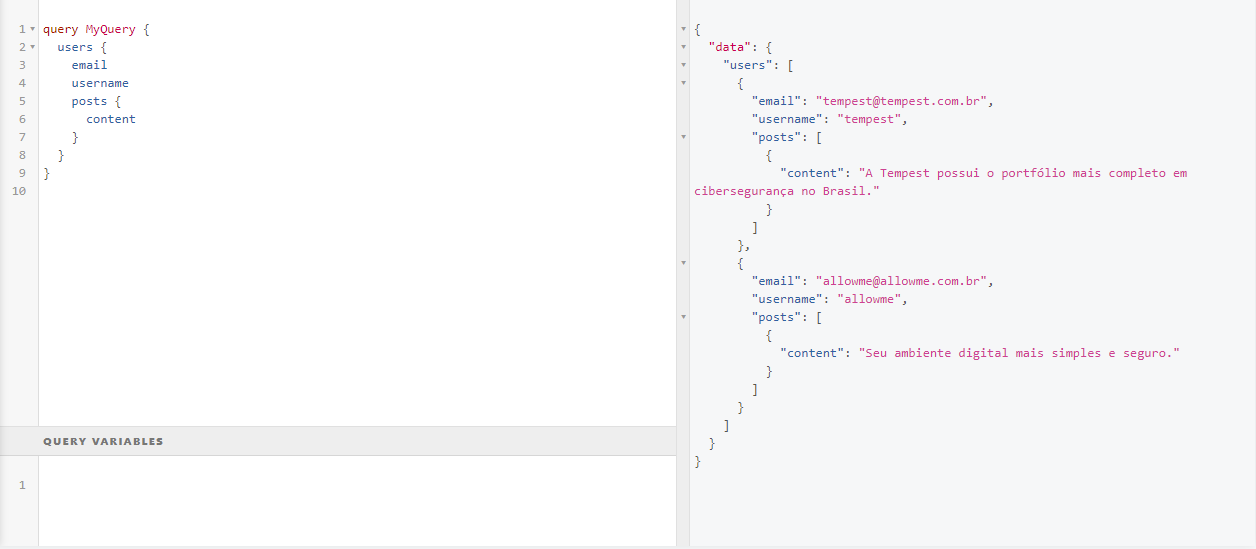
We even have an explorer with GraphiQL that will allow us to test and view the documentation automatically generated by GraphQL. Here are some query examples:

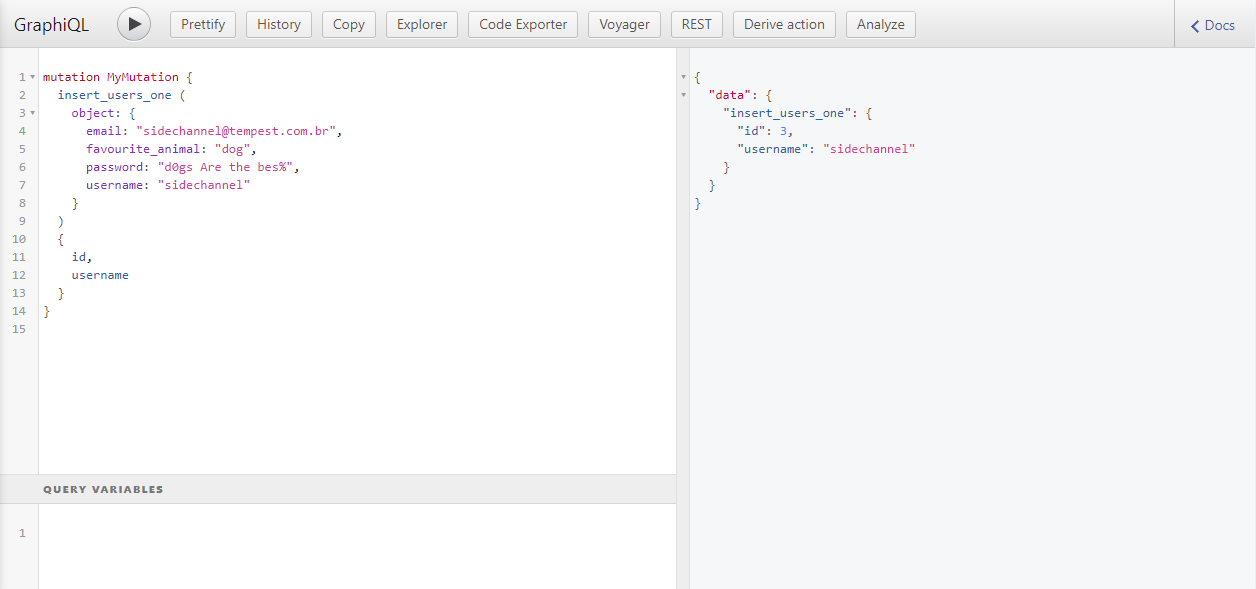
And an example of a mutation:
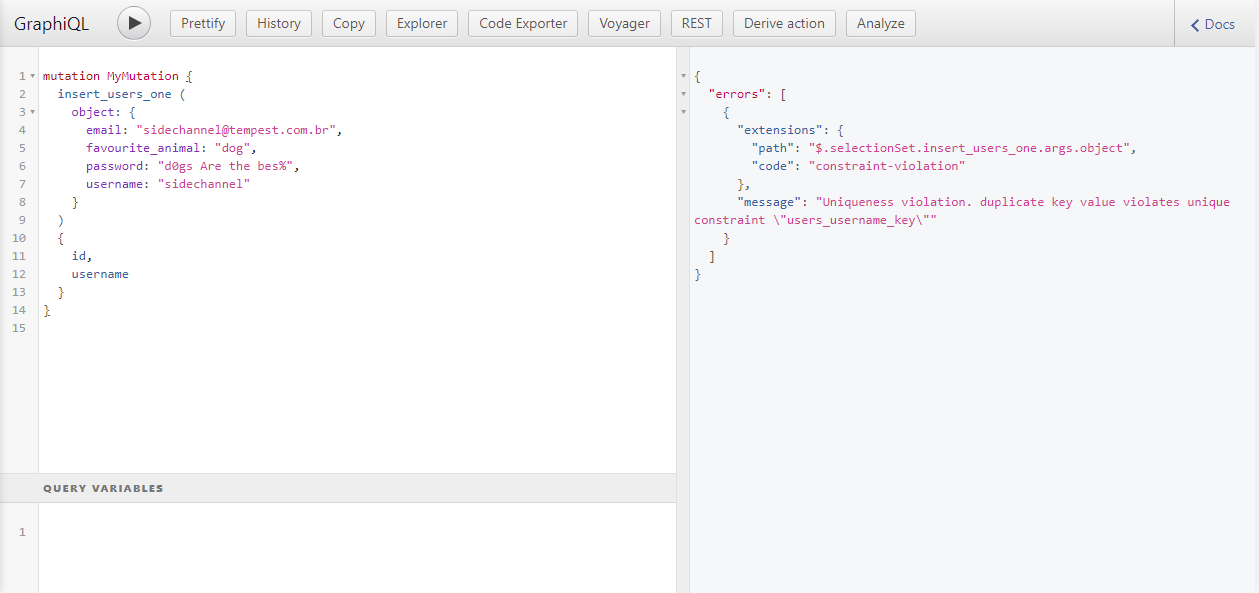
The generated API can also handle database validation errors, for example:
Conclusion
Hasura is a service that greatly eliminates the initial friction of using GraphQL APIs. It is extremely useful in cases of proofs-of-concept or MVPs that must be developed as quickly as possible. The lack of customization in the API, such as filters and constraints on the backend side, does not make Hasura by itself able to act as the sole backend of the application, but rather as something that mediates the database to other backend services.
Finally, Hasura has several other features that have not been explored in this article, all of which are, of course, available for study on the official website: https://hasura.io/